Monday 24 November 2014

Home made photo shoo & my personal style journey at 19!


Hey guys and dolls! today's post is a little home project photo shoot which my boyfriend photographed for me, He isn't a photographer but we managed. I thought i would do a little post on my own style and flair rather than my usual photo shoots which feature models and i both style and photograph so i thought i would get behind the camera for a change and tell you all about my style and where my real obsession and real fashion for personal style came from and of course my main inspirations.

From a really young age ive been interested in fashion i know everyone says that but i really was. From the age of 14 i began buying my favorite fashion magazine  which is of course vogue and i began flicking through the pages and not aspiring to become as skinny and the models or even be a model. But to wear the clothes! and i also took key ideas from the pages and began to buy second hand clothing from car boot sales and charity shops and styling the pieces i bought my own way but keeping them in style and i began to develop my own personal style from there.

And i know a lot of you are thinking well where did the vintage thing come from??.. 
well that came later much later. By the age of 16 i began to want my own style not like everyone else s still going thrifting often! but looking for more original and quirky items. My passion for style kind of took a brief break around my 17th birthday when i started sixthform and began making new friends and really wanting to fit in! Spending all my pocket money on ridiculously over priced basic fashion from the likes of topshop and primark. But after studying textiles for a year my passion began to come back. I wanted to start dressing again and dressing my own way!. Which of course is when i began to have a really hard time. I began to become a topic of discussion around sixthform and a laughing stock!. I began to become subject to rude and nasty comments. Which back then i couldn't handle i began to then question myself and the way that i dressed. I also lost a lot of so called friends people who were seen as "embarrassed" to be seen with me because i chose to dress differently. But looking at it all now i think it made me stronger as a person and i learned that people like that aren't worth having in your life. And ive now learned to take all the criticism with a pinch of salt! because everywhere you go in life you will come cross rude people!

However i then in my final year of sixthform began to work in my local vintage shop called ding dong vintage where i worked on a weekend with my mam and the shops owner who i had known for a few years beforehand. That is when my love for vintage began! of course i began to get paid which i had never experienced before. And when i was paid i started shopping more and buying clothes which ended up getting out of control and my style really started to take shape. I started to look at vintage and admire it and want to wear the amazing pieces i was around every weekend. I started to only shop for clothing and accessories in charity shops, car boot sales or online which became my new obsession. And for a whole year after that i enjoyed working there and studying all week for my fashion foundation at new castle college. Being around fashion everyday was something i enjoyed. But i didn't know what aspect of fashion i wanted to really go in until my tutor suggested i focused on styling. As she thought i always dressed well and could tell it was something i really enjoyed so i looked into it and i have never looked back! It is the thing i am actually good at because at school i really wasn't very good at anything.

My personal style is still developing and i am learning new things and new ways to style things everyday. I still look to fashion magazines sometimes as a stylist to find out trends for shoots but now as often. I now don't go to British vogue because i feel i doesn't give me that inspiration i need. But have began to read Italian vogue. And of course my main inspiration to be myself and dress however the hell i want is both advanced style and of course other bloggers and instagrammers like myself which dress the way they want and know who they are!. And even though im only 19 i feel as if i have learned who i am and how i want to dress. And i am exited to find out what confidence and style comes with getting older.

Me and my boyfriend decided to do a little photo shoot in my boudoir documenting my style.


Hope you enjoyed the post and i admire anyone who has actually read the whole post and stayed interested!!

Lots of Love, Original Vintage Queen 
xo
Monday 10 November 2014

DIY pom pom shoes in 5 easy steps!


So todays post is another DIY post! pom pom shoes are a massive trend at the moment and they are on dozens of websites at some ridiculous prices!and i usually dont follow "trends" but ive been lusting over a pair of shoes with pom poms for ages now but have never been able to find a pair that ive liked. So i decided to have a good and make my own using a pair of old heels and some wool i had lying around in the house.They where so easy to make and are easy to achieve in 5 steps! this proves you can do it your self and for a fraction of the price...

You get usually pick up a pair of good quality high heeled shoes of practically any colour from a charity shop for as little as £3! and you can use these as a base to decorate with your chosen pom pom/s. Or your could also add pom poms to flat dolly shoes or even kitten heels!

YOU WILL NEED -
WOOL IN YOUR CHOSEN COLOUR
TWO PIECES OF CARD CUT INTO TWO CIRCLES
SCISSORS

STEP ONE - 
first cut out two identical circles to your chosen size depending on how large you want your pom poms. Make sure you have a small hole in the middle place them together and begin winding your wool around them...


Continue to wrap your wool around your card until your card is completely full! but still has a small hole in the middle.


STEP 2! 

Begin carefully cutting your wool around the outside of your wool until you have gone right around.


STEP 3 !

carefull tie a piece of string around the middle of your circle on top of your card to hole your pom pom together.


STEP 4!

Carefully cut out the card from the middle of your pom pom.


STEP 5!

carefully trim down your pom pom to your desired size! and attach to your shoes!!!!


The final result!

You can attach the pom poms to your shoes using any size pom poms or even stacking pom poms to your shoes if you dont want them to make as much of a statement or your want a more subtle look. You can also add them to the back of your shoes! Here is some inspiration of different ways to customise using pom poms.


Image - Pinterest


Image - Pinterest


Image - Pinterest


Images - Pinterest


Image - Pinterest


Image - pinterest


Image - Pinterest


Sunday 9 November 2014

look of the day, "Classy traveller" FT home made map skirt!


Hey Guys and Dolls! today's look is inspired by a skirt i made myself for some of my fashion design projects, I made the skirt from a plastic table cloth for a project called grids and maps! And it has been lying in my wardrobe for just over 2 years unworn, so i decided to get it out and style it up! And as much as i hate layering up winters here and its getting cold already and its only the beginning of November so i imagine by December its going to be freezing! so ive layered up with a cute cropped jacket and of course my winter saviours coloured tights and fur! And todays hair is inspired of course by Betty Grable! So here it is..


Fur - vintage ebay
blue cropped jacket charity shop -£2
white belt £1 charity shop
mustard tights - £2 primark
red platforms - £2.50 charity shop
vintage handbag - Gift
red shirt - winds moor - £4.50 charity shop


Flower ring 50p - charity shop!


Gold watch - Mams


set of rings - 99p ebay


Vintage chanel brooch - Mams
Blue layered necklace - £2 charity shop


Earrings - YSL


- Original vintage queen x 

Monday 3 November 2014

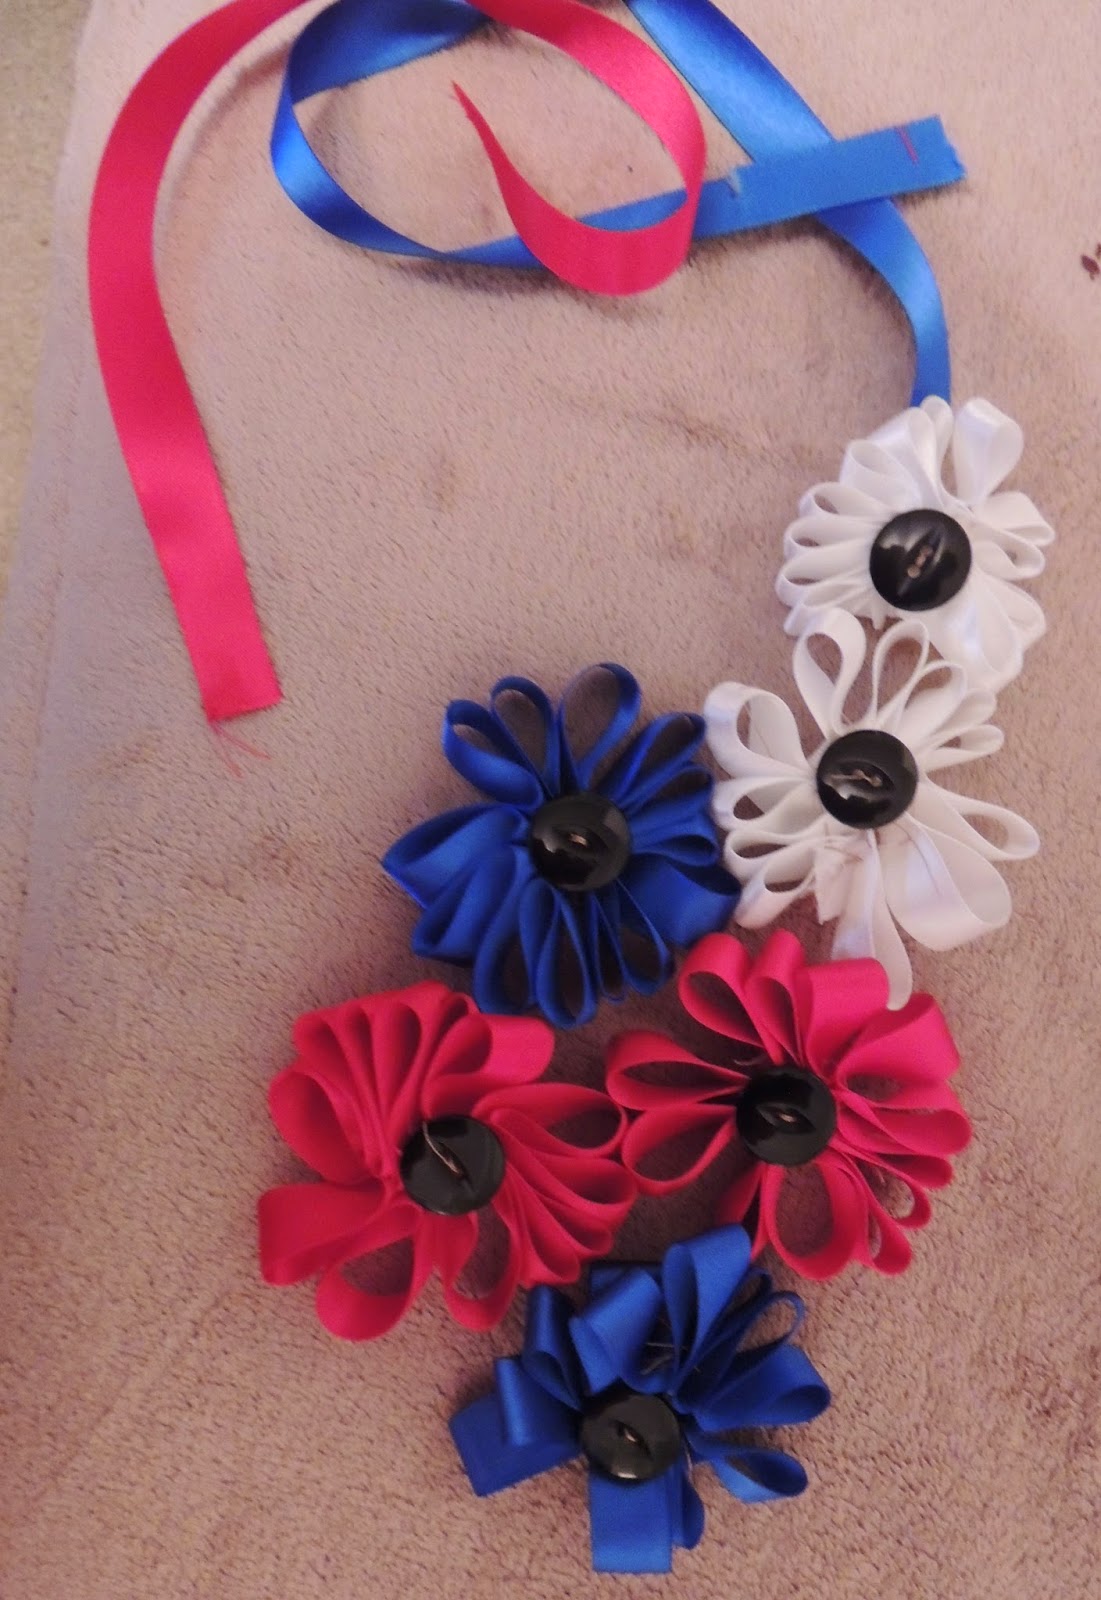
DIY STATEMENT RIBBON NECKLACE! stylish on a budget!


Yet again.. ive been lacking in the blogging department but ive been incredibly busy this past few weeks. Ive started a new job which is taking up surprisingly a large amount of my time as im trying to save up for the festive season! which i am rubbish at doing so i will most likely end up saving 0% of my wages but hey ho its worth a try right?

Ive also been working on both my digital and photography portfolio as its university time! and the time for applying for university. So ive been spending a lot of time doing new styling shoots for my application. But im trying my best to get back up on the blogging horse! ( SOUNDED much better in my head) and start blogging at least 3-4 times each week again now im all sorted. And this post has been waiting to be done for some time so i thought since i have the time i may as well post! 

I recently found a book called " chic on a shoe string" showing you how to make clothing, accessories and home decorations on a small budget and you get to make them all yourself which is even more fun! and you can make incredible accessories for a tiny price! which i love but being able to make them yourself is even better. So i decided to make this vintage inspired ribbon flower necklace but changed up the colours a little to red white and blue! so here's a step to step guide on how to make your very own ribbon necklace.


You'll need -

8 buttons, of your choice, but not to heavy!


approximately 8 metres of ribbon, in the colour of your choice


Strong glue and a needle and thread in your chosen colours


Firstly start by making 12 small loops with the ribbon and sewing it all together but not to tightly as you will need to pull out the ribbon to create your flower.


Then pull out to create your flower and then use a small pea sized amount of super glue to hold the flower together,


then sew on your button using your chosen coloured thread.


Repeat this method until your have a total of 12 flowers.


Then to attached all the ribbon flowers together by stitching the flowers together from each of the petals. Using the same coloured thread so the thread is un noticeable. You can change the layout of the flowers depending on your chosen design.


Then finally attach ribbon onto the top two flowers to create the neck fastening. I added a simple bow to my necklace to save time but you could add a fastening or press stud if you choose.


This is one of the simplest necklaces to make except for it isnt for someone who isnt patent as it does take time to perfect the flowers from the ribbon but it is worth it in the end. And it cost me around £3 to make so anyone who wants a statement piece for less this definitely does the trick.


I hope you enjoyed this post! and you give this necklace a go! i am hoping to try out diy projects which i hope to be posting soon!

Original vintage queen!